Gel Electrophoresis
This page is meant to serve as a centralized repository for all Pugh Lab protocols related to running agarose and polyacrylamide gels.
Agarose Gels
General Notes:
Sonication Check
| Recipes (Prepare ahead of time) |
|---|
| 2X Proteinase K Buffer |
| TE + RNase |
Supplies
- Phenol-Cloroform:Iso-amyl alcohol (Common reagents fridge)
- When aliquoting lab stock, only transfer the bottom layer
- 3M Sodium Acetate (3M NaOAc) – located with RT aliquots
- 100% EtOH, chilled at -20°C
- 70% EtOH, chilled at -20°C
- 20mg/mL glycogen at -80° (Freezer 801)
- 1.5mL tubes, pre-labeled
- Pre-cooled centrifuge 4°C, turn on at step II-6
- PPE including safety glasses throughout, gloves throughout, and a lab coat when working with PCIA
Quick Reverse Crosslink
- Locate the 50 uL sonication check sample from the -80°C fridge and let thaw.
- Add 175uL TE to each 50uL sonication check sample. Adjust for other sample volumes such that the total is 225 uL (i.e. for a 75 uL son check sample, add 150 uL TE buffer).
- Add 225uL 2X proK buffer.
- Add 2.5uL 20mg/mL proteinaseK.
- Incubate samples at 65°C for 30 minutes minimum.
- You may also incubate the samples overnight at 65°C (no more than 16 hours) and skip step 6, continuing to PCIA Extraction/Ethanol Precipitation the following day for a good stopping point.
- Incubate samples at 95°C for 10 minutes. Caps will pop if not properly secured with colored tabs or an aluminum block on top.
PCIA Extraction/Ethanol Precipitation
- Extract by adding 450 uL PCIA. Vortex each sample for ~20 seconds. The sample will become cloudy.
- Do this step in the fume hood
- Centrifuge samples 6 minutes at 14K rpm, RT.
- Remove glycogen from the -80°C freezer and leave at RT while centrifugation is in progress.
- Carefully transfer 400uL of the upper aqueous layer to new 1.7 mL tube.
- It is best to transfer the 400 uL by removing 200 uL at a time with a p200 micropipette.
- If you manage to transfer some PCIA to the new tube, the sample will turn white when shaken or vortexed. If this occurs, revert to step 2.
- Add 42uL of 3M NaOAc to each sample.
- Add 1uL of 20mg/mL glycogen.
- Add 1000uL of ice-cold 100% EtOH to each sample. Vortex to mix thoroughly then incubate for 20 minutes at -80°C. Fast Temp a centrifuge capable of 14K rpm at this point.
- You may also incubate overnight at -20°C for a good stopping point.
- Pellet by centrifuging for 15 minutes at 14K rpm, 4°C.
- Remove supernatant via pipette.
- Wash pellet with 500uL of ice-cold 70% EtOH. Add to the side of the tube to avoid disturbing pellet.
- Centrifuge 5 minutes at 14K rpm, 4°C.
- Carefully pour off or pipette off supernatant. Dry the pellet at room temperature for ~20 minutes or in the speed vac for ~15-20 minutes at 45°C.
- If you need a good stopping point, the sample may be left at 4°C overnight resuspended in 10uL of ddH2O.
- Resuspend samples in 20uL of TE+RNase and incubate at 37°C for 30-60 minutes.
- Run a 1% agarose gel at 135V for 20-25 minutes. Upload an annotated gel image to appropriate Box folder.
Library Check
YEP note: Only the last 8 samples in a set of 48 are checked (which includes the Reb1 positive control and BY4741 negative control) under the assumption that those 8 are representative of the whole.
- Thoroughly clean and rinse an appropriate size gel box.
- Make a 2% agarose gel (100 ml 1x TAE + 2g Agarose + 50 µl 1 mg/ml Ethidium Bromide = 2% gel). Microwave TAE + agarose on high in Erlenmeyer flask until agarose in fully dissolved and solution begins to boil (stop heating and swirl flask every 30 sec until boiling point is reached).
- Place flask on an orbital shaker at room temp for 15 min to allow the gel to cool. Add ethidium bromide (50 µl at 1 mg/ml), swirl in flask, and then pour gel with 1.5 mm a comb. Allow gel to solidify for at least 15 min.
- Spin down samples briefly.
- Add 1/5 volume (2 µl) of 6X xylene loading buffer to 10 µl PCR sample (24 cycles).
- Positive and negative PCR controls receive 8 uL of 6X xylene loading buffer
- Place gel in gel box with the wells at the top (Black electrode) and fill gel box with 1x TAE buffer. Gel should be completely submerged.
- Load 3 µl of 1kb Ladder in lane 1, and 10 µl of each PCR reaction in subsequent lanes.
- Run gel at 145V for 23 min (run to Red electrode).
- Take short wavelength UV image of gel. ChIP-exo libraries should appear as a smear between 200 and 600 bp in size. An adapter dimer band 150 bp in size may also be present.

Gel Excision
Gel Purification
- Thoroughly clean and rinse an appropriate size gel box.
- Make a 2% agarose gel using molecular biology grade agarose 100 ml TAE + 2g Agarose + 50 ul 1 mg/ml Ethidium Bromide = 2% gel
- Pour gel with thick comb
- Spin down samples briefly.
- Pool 10 uL of each sample into one tube. When pooling samples, make sure that samples with identical barcodes are not pooled together.
- Add 1/5 volume of sequence-grade 6X xylene loading buffer to combined sample. (14 ul dye added to 70 ul sample)
- According to the image below, load samples into wells. Note: Libraries with the same indexes must not be run in the same gel.
- Load 7 ul 1kb Ladder. Load the samples (region B) on an agarose gel between 1 kb ladders (regions A & C) as shown in the Figure. If possible, leave a one-lane gap between samples.
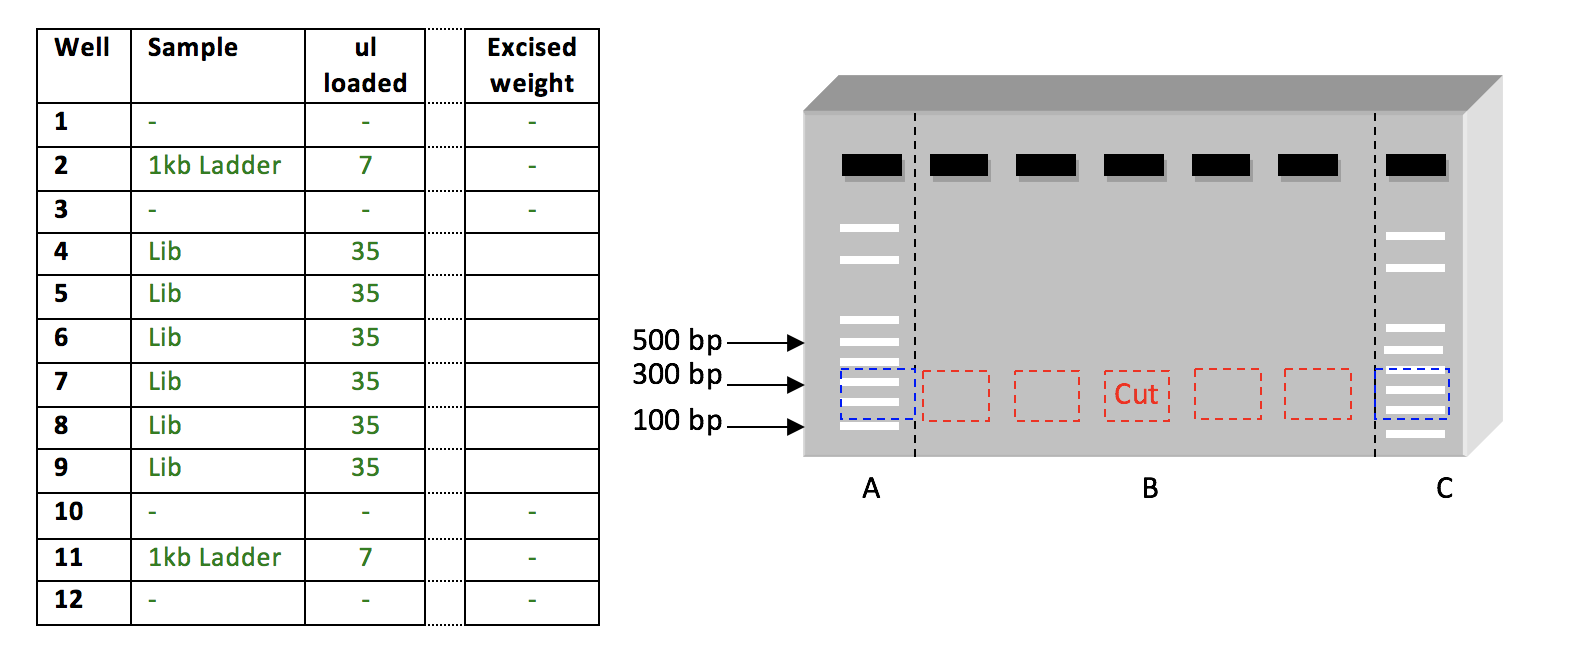
- Run gel at 145V for ~23min.
- Following electrophoresis, excise Lanes A & C (dashed Black lines) from the gel. Leave “region B” of the gel at your bench.
- Visualize Lanes A & C on a transilluminator, and mark the desired DNA fragment size on the DNA ladders. A standard library should be size-selected from 200 – 500 bp.
- Reassemble the gel at your bench, using Lanes A & C as markers, excise the sections of agarose containing DNA fragments of the desired size (Red boxes).
- Place each gel excision into a 1.5 ml tube.
- Record weight of each excised piece. Write this weight directly onto LoBind tube.
- NOTE: Excised gel pieces must be under 0.3 g. If gel pieces exceed 0.3g, cut the piece in half and put one piece in a new tube, and the other in the original tube. Record the weight for both.
- Take short wavelength UV image of excised gel.
Qiagen cleanup
Notes: All buffers and centrifuge spins should be at room temperature.
- Add 3 volumes of Buffer QG to 1 volume of gel (maximum gel weight of 300 mg per tube).
- Dissolve the gel slice by vortexing at 50°C until the gel slice has completely dissolved (~10 min).
- Add 1 gel volume of isopropanol to the sample and vortex.
- Place a Qiaquick minielute column in a provided 2 ml collection tube.
- Place all identical samples in the column and place as much (~750 ul) as will fit the column each time
- Microfuge 1 min, 13,000 rpm, room temperature.
- Discard flow-through. Place the Qiaquick minielute column back in the same collection tube.
- Repeat until all three tubes of same sample is filtered through the same column.
- Add 0.5 ml Buffer QG.
- Microfuge 1 min, 13000 rpm, room temperature.
- Discard flow through. Place the Qiaquick minielute column back in the same collection tube.
- Add 0.75 ml Buffer PE.
- Let samples stand at room temperature for 2-5 min.
- Microfuge 1 min, 13000 rpm, room temperature.
- Discard flow through and place column back into collection tube.
- Spin down once more 1 min, 13000 rpm, room temperature in order to remove all EtOH.
- Discard flow through. Place the Qiaquick minielute column in a fresh 1.5 ml Lo-Bind tube and let sit to dry for 2 min.
- OPTIONAL: Warm ddH2O or EB buffer at 50˚C for 5min.
- Add 40 ul ddH2O directly to membrane of column. Let column stand for 1 min.
- 1/10th EB buffer can be used in place of ddH2O.
- OPTIONAL: If you suspect that your yields are low then: 2x 20ul elutions into separate tubes, Vinesh reports 2-10x more concentrated DNA in the 1st eluate.
- Microfuge 1 min, 13,000 rpm, room temperature.
- Calculate the crude concentration of the sample using the Qubit.
- Store sample at -20˚C
- Determine concentration of sample via qPCR. Note: A quick estimate of the DNA concentration can be made using the Qubit dsDNA high sensitivity assay kit. A normal library will have a concentration >1 ng/ml when diluted 1:200.
Qubit Directions
- Add 199 uL of dsDNA High Sensitivity Buffer (big bottle) and 1 uL of Qubit High Sensitivity Reagent to a 1.5 mL Eppendorf tube and gently vortex.
- Transfer 199 uL of this mixture to a Qubit tube.
- Add 1 uL of your sample to the mixture in the Qubit tube.
- Gently vortex the solution and let it stand for 2 minutes.
- Set the Qubit to the "Quant-iT dsDNA, HS" setting.
- Insert Qubit tube into the fluorimeter and calculate the concentration of the sample.
- Record the concentration in your notebook and on the tube containing your pooled samples.